Prints
Cards
Gifts
Wedding
Explore
Tutorial: 10 Minute DIY Photo Banner
Hi Everyone and Happy December!
I’m Kristin and today I’m sharing a step-by-step tutorial for a simple DIY photo banner. This DIY photo banner can be completed in less than 10 minutes. It’s also a great activity for kids and can be used for any occasion.

Supplies Needed
- 4×4 Cardstock Photographs
- Hole Punch
- Bakers Twine
- Washi Tape
- Hole Reinforcements (optional)
- Hanging hardware (I used thumbtacks)
Step One: Gather your photographs. Punch two holes at the top of each picture about 2.5 inches apart.

Each individual photograph should look like this.

Step Two (optional): Flip over each photograph and place hole reinforcement stickers over the holes. This will make the project sturdier and less likely to tear at the holes.

Step Three: Gather your bakers twine and thread the first photo as shown below. The twine should run behind the photograph.
The amount of twine you use will depend on the amount of photographs in your banner. If you are using 4″ photos, you should cut off 5″ of twine for each photo plus an extra 6 inches of twine on either side for hanging.

Step Four: Use a small strip of washi tape (masking tape works too) to adhere the twine onto the back of the photograph. This will ensure that the photos don’t move around at all when you hang up your banner.

Here’s a closeup shot of the back of one of the photos. I used a wide washi tape for added strength.

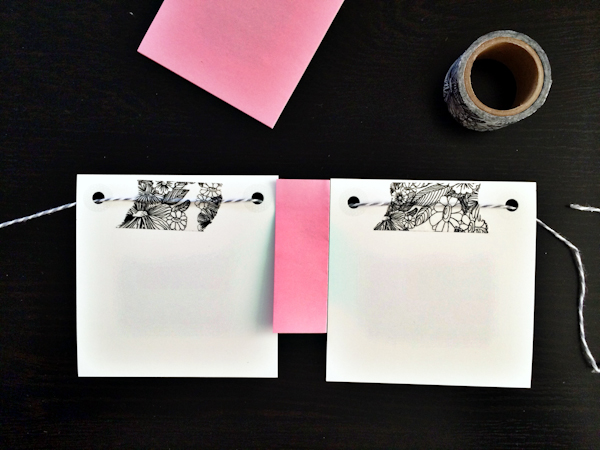
Step Five: Repeat steps three and four for each of your remaining photos. For even spacing: create a guide using a sheet of scrap paper. Measure the space between the first two photographs, and then use that guide between each of the subsequent photos. My guide was made from a folded post-it note.
Step Six: When you’re finished threading and taping all of the photos, you can hang up your banner.

Take it one step further:
- Embellish your photos with washi tape or other paper-crafting goods
- Use a decorative punch to add detail to the bottom edge of the photo
- Add in extra printable cards (like these awesome holiday ones from Persnickety Prints)
- Convert all your photos to black & white, sepia, or use the same instagram filter on each one.
- To make this project extra special, I printed out digital scrapbook layouts (designed with a Paislee Press kit) as 4×4″ photographs.
This DIY Photo Banner is great for any occasion:
- Holiday decoration banner
- Birthday Party banner
- Favorite photos banner
- Bridal shower banner
- ..and lots more
Thanks so much for stopping by and checking out my 10 minute DIY photo banner! I look forward to sharing more DIY and memory-keeping photos throughout the month of December and into the new year.
Kristin is a millennial storyteller who loves documenting her everyday-life and awesome adventures. As the owner of rukristin papercrafts, a venue to share information and inspiration on creative ways to tell your story, she encourages others to dream big, find their voice, and be the author of their own adventure. An introvert who loves community, she loves meeting new friends online — drop her a line on twitter, instagram, or facebook and follow along with her story at rukristin.com.